People in Watercolor
Reference Photos or Live Model
For many years I have carried a small digital camera, especially during travel, outings to the park, or family gatherings. With time, I have accumulated a multitude of reference photographs suitable to interpret into paintings. In more recent times, many of my action shots include grandchildren.
For photographing people using a digital camera, always set the flash to the "off" setting. Although this results in some blurred shots, it allows the photograph to capture shadows. Conversely, the camera flash tends to destroy shadows and flattens the image. Of course now days, most of us carry a cell phone. Cell phone cameras seem to function quite well in indoor lighting conditions without the need for a flash.
Although photographs are an extremely valuable tool, also take advantage of any opportunity to work from a live model. In the past, I would join art friends to paint with a volunteer model, or share the cost of paying a model. Another good option is to join a life drawing class often offered through the local college. Many such classes allow the option to audit the class for non-credit, or reduce fees for seniors.
Light and Shadow
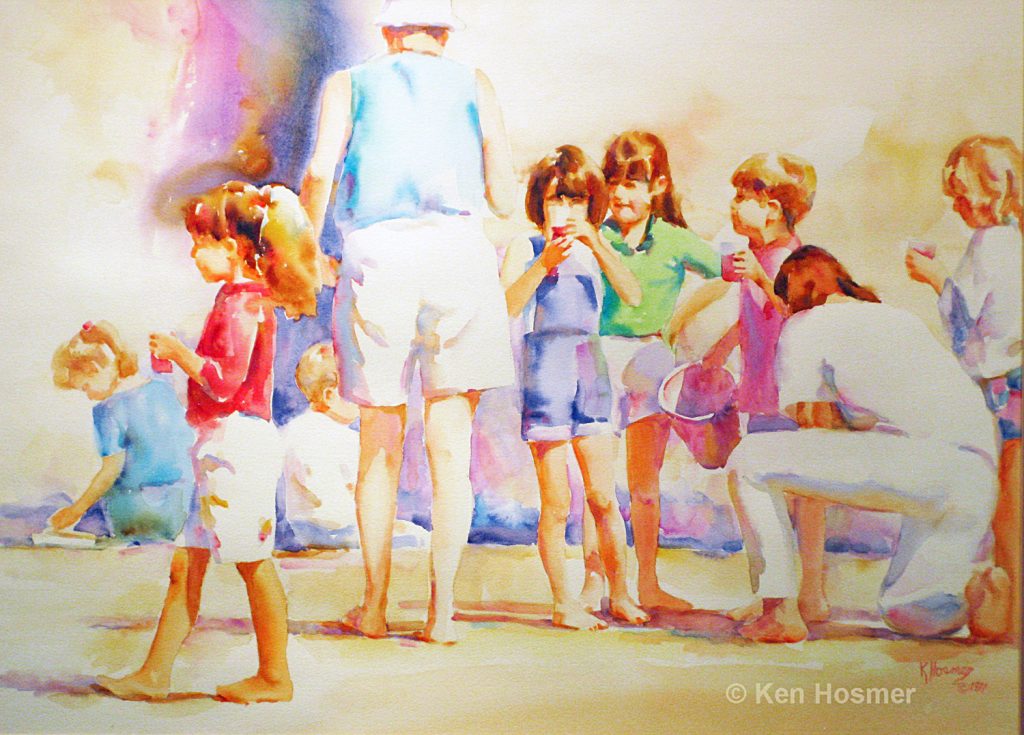
In painting figures, a top priority is to portray light and shadow—so first decide which direction the light is coming from. I mentally analyze the human figure into planes: left, right, top and bottom. I then ask myself, which planes are catching light and which fall into shadow.
Since human figures are composed of mostly curved forms, many of the shadows have soft edges. Beware that too many hard-edged shadows in the face or body can easily destroy the illusion of rounded curves.
When painting the human face, the first step is to focus on the shadow side of the face and block in the overall base shadow, deciding value and color. How dark does this shadow need to be? Dark enough to make the light look light. So the base face shadow is usually a full mid-value. A common error is to make it too light. So the solution is to boldly block in the shadow side of the face, then while the paint is still damp, quickly soften shadow edges and lift any small lights with a moist brush. After this dries, I add accent shadows such as eyes, upper lip and recessed areas of the ear.
Likeness
The key to catching a person's likeness is to fine-tune the facial shadow shapes. The more accurate these shapes, the more the painting will look like the actual person. However, the challenge in watercolor is to refine shape without overworking the painting. When finished, I would rather have a nicely flowing watercolor painting than to have it look exactly like my grandchild—I can always attempt a likeness again later, with another painting.
Skin Tone Colors
In most "how-to" art books, skin tones are presented as various mixtures of red, yellow and blue.
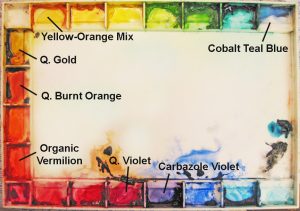
With my selected palette of colors, I usually begin with thinned organic vermilion and quinacridone gold for the base skin color; for shadows I add quinacridone violet, quinacridone burnt orange, and sometimes a small amount of cobalt teal blue; for lights I leave white paper or add a pale tint of yellow-orange mix. When painting people with dark skin tones, I often begin with a mixture of quinacridone burnt orange and carbazole violet. Note, rather than rely on an exact color recipe, it is better to observe the actual hues in the skin and mix accordingly.
Reflected Colors
To visually tie the painting together, it is especially important to include reflected or "bounce light" colors. Cool background and clothing colors will reflect or bounce into the shadows of the face and skin. Also, each item of clothing should include colors from adjacent clothing items. For example, the shadow on the red shirt should have red, plus a reflected bounce of blue from the pants. The blue pants should have a shadow containing blue, plus red from the shirt.
When painting clothing and hair I usually paint the darkest shadows first, then slide into the mid-values. I work around the lights and soften edges as I go.
Movement and Edges
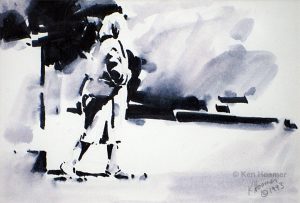
Figures should not seem frozen in a painting, but rather have the illusion of lifelike movement. The key to capturing this effect is the use of lost and found edges—especially along the outer perimeter of figures. After the painting is complete, I always go back and lift or soften additional edges. I normally alternate hard, found edges with blurred, lost edges. It is important to notice that the imagination of the viewer will recreate the soft or missing edges.
Another trick is to match the value of the background to that of the subject. This confuses the viewer's eye, creating ambiguous edges. Again, lost and found edges are the strongest tool we have to create the illusion of movement.
Simplified Background
I usually eliminate unnecessary detail in the background and manipulate color and value to enhance the figure. In some areas I might place a contrasting value or complementary color behind the figure to emphasize it, or in other areas I camouflage the figure with similar colors and values in the background.
If the setting or location is important I will give clues. So if figures are dining in a cafe, I might include a table with a brief indication of food or drink. However, a detailed rendition of multiple food items is unimportant.
Ultimately, I want my paintings of human figures to feel alive with a sense of movement and enhanced color variations. In this way, I hope to celebrate everyday moments in life.
Incidentally, painting the human figure uses many of the same methods used to depict animals. See the previous blog post:
Animals in Watercolor
